In the current version, you can use reinforcement style templates to create reinforcement styles for the following objects:
Parameters Description File
The parameter description file in JSON format for reinforcement units must contain grouped reinforcement style parameters in the following structure:
{
"metadata":{
"defaultName": "DefaultName",
"description": "Description",
"version": "1.0.0",
"author": "Author"
},
"styleParameters":[
{
"name": "Group1",
"text": "Group 1",
"params": [
{
"name": "ParameterName",
"text": "Parameter name",
"type": "Id",
"entityTypeId": "0000000-0000-0000-0000-000000000000"
}
]
},
{
"name": "Group2",
"text": "Group 2",
"params": [
{
"name": "ParameterName",
"text": "Parameter name",
"type": "Length",
"default": 595,
"min": 1,
"max": 1000000.0
}
]
}
]
}
The metadata section contains data that will be displayed in the Reinforcement style templates window in Renga Professional. The style template version must be specified as 3 numbers separated by dots, such as "1.2.34".
The styleParameters section contains parameter groups that describe all possible style parameters. The visibility of parameter groups in the style editor can be enabled or disabled using the Style Template API functions.
Each parameter must contain a name, text, and type. Depending on the parameter type, additional data is specified.
Allowed parameter types:
| Value | Description |
| Integer | Integer |
| Real | Real number |
| String | String |
| CoreEnum | Style Template API enumeration |
| UserEnum | User enumeration |
| Length | The length in millimeters |
| Angle | The angle in decimal degrees |
| Id | Identifier |
| Boolean | Boolean (true/false) |
For all parameter types except Id, you can specify the default key. The value of this key will be the default value of the parameter. The value cannot be empty.
For numeric parameters, you can set the minimum and maximum values using the min and max keys.
For CoreEnum, specify the CoreEnumType key. Valid values for the key can be found in the Core Enums section.
For UserEnum, create an items array and set the values to select from the list.
"items" : [
{
"key" : "Item1",
"text" : "Item 1"
},
{
"key" : "Item2",
"text" : "Item 2"
},
{
"key" : "Item3",
"text" : "Item 3"
}
]
To allow a user to select a rebar style in the reinforcement style parameters, create an Id parameter:
{
"name": "RebarStyleId",
"text": "Rebar style",
"type": "Id",
"entityTypeId": "608edb78-96f3-40a6-a0ec-71000105581b"
}
To allow a user to select a reinforcement unit style in the reinforcement style parameters:
{
"name": "UnitStyleId",
"text": "Reinforcement unit style",
"type": "Id",
"entityTypeId": "7ee13bd6-7c0a-47d3-adce-35b8e0dae28a"
}
Script Files
The Lua script should contain the following elements:
- Setting up the display of parameters in the reinforcement style editor.
- Description of the object reinforcement.
Setting up the parameters states in the reinforcement style editor
To control the reinforcement style parameters, you need to define the SetStyleParameterStates() function. An instance of the ParameterContainer() class is passed to this function. This instance can be used to modify the values of the parameters in the container.
Example of parameter state control using SetStyleParameterStates():
function SetStyleParameterStates(parameters)
local values = parameters:GetParameterValues()
local needUpOverhangs = parameters:GetParameter("General", "UpOverhangs")
needUpOverhangs:SetEnabled(values.General.HasUpOverhang == "Yes")
end
Creating reinforcement
To create an object reinforcement, you will need to define the CreateObjectReinforcement() function. This function accepts the reinforced object and reinforcement style parameters as input. The CreateObjectReinforcement() function should return an instance of the ReinforcementContainer() class.
function CreateObjectReinforcement(object, styleParameters)
-- creating reinforcement
...
reinforcementContainer.AddRebar(...)
...
reinforcementContainer.AddReinforcementUnit(...)
...
return reinforcementContainer()
end
Local coordinate systems of reinforcement objects
Reinforcement is located relative to the origin of the object local coordinate system. The position of the origin depends on the type of object.
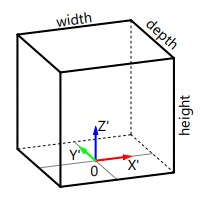
Isolated foundation
The origin of an isolated foundation is located in the center of its bottom face. The coordinate axes are arranged as follows:
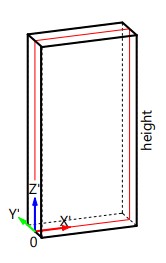
Wall
The origin of a wall is located at the beginning of a straight section of the base, without considering the junction section. The OX' axis is directed tangentially to the center line of the wall base layer.
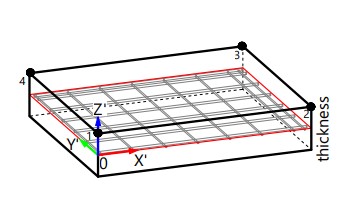
Floor
The origin of a floor is located at the first point of the floor contour in the center of the base layer. The OX' axis of the floor local coordinate system is directed at the floor reinforcement angle to the OX axis of the global coordinate system of the building model.
Getting the rebar style and its parameters
To get the rebar style, use the GetRebarStyle() function, which returns the rebar style by ID. Then you can obtain rebar style parameter values using the GetParameterValues() function.
Example of how to get rebar diameter:
print(rebarDiameter)
value GetParameterValue(Entity entity, string name)
Returns the parameter value by name.
Entity GetRebarStyle(number id)
Returns the rebar style by its id.
Selecting the edges of an object to create a reinforcement
To solve various reinforcement tasks, such as defining cover rules for the face of an object or describing overhangs, it is necessary to select the faces of the objects. To do this, Renga STDL provides selectors for the edges of the reinforced object. There are several types of selectors available:
- Object side selector selects the faces of an object that match the specified side. The set of sides depends on the type of object. For example, a wall has left, right, top, bottom, front, and back faces.
- Voiding selector selects the faces of an object that are formed by intersection with another object. When using this selector, the type of the interaction object is specified.
Cover rules
Cover rules are set using face selectors. To set cover rules, you need to provide a table of pairs. The first element of each pair is the face selector where you want to create the cover. The second element is the size of the cover.
local coverRules = {
{{}, 150}
}
WallSide
Wall side.
Definition ObjectSide.h:21
Selects the faces of an object that match the specified side.
Definition FaceSelector.h:52
Selects the faces of an object that are formed by intersection with another object.
Definition FaceSelector.h:24
Reinforcement with parametric meshes
Rebar row
The rebar rows parameters are set using RebarRowParameters. It can be created by passing the required parameters: the rebar style and the layout type. Let's start by looking at the layout methods.
- Layout with edge protection. With this layout the rebars are located between support rebars which are located along vertical or horizontal edges. In this layout, the distance between the edge‑mounted rebar and the previous one may differ from the specified step. To prevent rebars overlapping, a minimum clearance between bars is used, defining the smallest distance between rebars. If the layout algorithm results in with the distance less than the minimum clearance, the rebar that violates this requirement is not added to the row. By default, a minimum clearance is equal to 25 mm.
local rebarStep = styleParameters.ReinforcingMesh.LongitudinalRebarStep
Rebars layout with edge protection.
Definition RebarRowEdgeProtectionLayout.h:16
number MinClearance
The minimum clearance between rebars. The default value is 25 mm. This parameter sets the minimum all...
Definition RebarRowEdgeProtectionLayout.h:38
- Uniform layout. With this layout the rebars are located with a uniform step across the entire reinforcement area. This allows you to synchronize the reinforcement of an object with the reinforcement of objects located above or under the reinforced one. To synchronize the position of a rebar with the object above, you can offset the bar by a small distance so that the rebar overhangs of the objects do not overlap, but stay close to each other. For this, all rebars displacement is used.
local rebarStep = styleParameters.ReinforcingMesh.LongitudinalRebarStep
Example of creating a reinforcing mesh row parameters object:
local rebarId = styleParameters.ReinforcingMesh.LongitudinalRebarStyleId
Parameters of the row of rebars.
Definition RebarRowParameters.h:23
Overhangs
Overhangs are set using face selectors. To set overhangs, you need to provide a table of pairs. The first element of each pair is the face selector where you want to create the overhangs. The second element is the set of overhang parameters, which include the rebar hook parameters.
- Rebar overhang parameters. Determine how much the rebar extends from the specified face. You can enter several values, including negative ones.
- Rebar hook parameters. Allows you to set extension length, bend angle and rotation angle of the hook around the rebar axis.
The overhangs do not extend into the faces formed by windows, doors, openings, openings.
local topWallAnchorForm = {math.pi/2, 200}
local overhangParameters = {
{{}, overhangForAnyOtherObject}
}
rebarLayoutParams.
Overhangs = overhangParameters
Rebar overhang parameters.
Definition RebarOverhangParameters.h:20
table Overhangs
Overhang values.
Definition RebarOverhangParameters.h:50
Reinforcement with a single mesh
Reinforcement with a single mesh is set using ReinforcingMeshParameters. To set reinforcement, you need to provide the necessary parameters, including the parameters of the longitudinal and transverse rows, as well as the free ends of the longitudinal and transverse rebars.
reinforcingMeshParams.TransverseFreeEnd = 20
Rebar mesh parameters.
Definition ReinforcingMeshParameters.h:22
number LongitudinalFreeEnd
The longitudinal rebars free end.
Definition ReinforcingMeshParameters.h:51
Since version 4.2, only parameters for longitudinal or transverse reinforcement can be passed.
Setting of the longitudinal and transverse rebar rows order
Longitudinal and transverse rebar rows order are set using ReinforcingMeshRowsOrder enumeration. Enumeration defines the reinforcing mesh rows relative order. For horizontal objects, such as a floor, the view direction is from top to bottom. For vertical objects such as a wall, the view direction is from front to back.
- LongitudinalInFront. The longitudinal rebars are placed in front of the transverse rebars.
- TransverseInFront. The transverse rebars are placed in front of the longitudinal rebars.
ReinforcingMeshRowsOrder
Enumeration defines the reinforcing mesh rows relative order. For horizontal objects,...
Definition ReinforcingMeshRowsOrder.h:30
Controlling the approximation of the reinforcement region
Controlling the approximation of the reinforcement region allows to replace initially non-orthogonal to the rebar directions sides with orthogonal ones. In this way, you can decrease the number of unique rebar shapes that may appear when there are sloped or curved surfaces.
reinforcingMeshParams.UseRectangularApproximation = true
Creating reinforcing mesh in base layer
The reinforcing mesh in the object base layer is created by the CreateReinforcingMeshInBaseLayer() function.
InLayerAlignment
Enumeration defines the relative surface of the base material layer of the object.
Definition InLayerAlignment.h:23
ReinforcementContainer CreateReinforcingMeshInBaseLayer(Entity object, table clearCoverRules, ReinforcingMeshParameters meshParameters, InLayerAlignment oMeshAlignment, number oMeshOffset)
Creates a reinforcing mesh in the object base layer. Currently Walls and Floors are supported.
Reinforcement with double mesh
Reinforcement with double mesh is set using DoubleReinforcingMeshParameters structure. To set reinforcement, you need to provide parameters of two meshes. The order of rows and approximation is controlled in the same way as for a single mesh.
Double reinforcing mesh creation parameters. The front and back meshes are determined by the viewing ...
Definition DoubleReinforcingMeshParameters.h:29
Object edge reinforcement
Object edges reinforcement is set using EdgeReinforcementParameters structure. To set edge reinforcement, you need to set the reinforcing detail and it's layout type along edge.
local edgeReinfStyle = styleParameters.EdgeReinforcement.EdgeRebarStyle
edgeRebar.RebarStyleId = edgeReinfStyle
edgeRebar.LeftLegLength = 500
edgeRebar.RightLegLength = 500
edgeRebar.BaseLength = 100
edgeRebar.BendingFactor = 2 --- по умолчанию
Reinforcing detail layout from edge center.
Definition EdgeReinforcementCenteredLayout.h:18
Parameters of object edges reinforcement.
Definition EdgeReinforcementParameters.h:24
Parameters of U-shaped rebar.
Definition UShapedRebarParameters.h:24
In the edge reinforcement parameters, you can use the table of face selectors to set the faces that need to be reinforced:
ModelObjectType
Object types.
Definition ModelObjectType.h:29
Supports parameters
Supports are set using ReinforcingMeshSupportsParameters structure. To set supports, you need to provide the supports detail and the supports layout.
Rebar mesh supports layout with setting the number of cells passed between the elements. The supports layout step is measured in the number of cells passed. Rebars rows displacements. They are measured in the number of cells passed. Displacements values are applied sequentially to each horizontal row. This parameter allows you to specify the type of details layout, for example, straggered layout.
local supportsHorStep = 2
local supportsVerStep = 1
Rebar mesh supports layout with setting the number of cells passed between the elements.
Definition ReinforcingMeshSupportsCellLayout.h:30
table Displacements
Rebars rows displacements. They are measured in the number of cells passed. Displacements values ar...
Definition ReinforcingMeshSupportsCellLayout.h:56
Rebar mesh supports layout with setting the distance between elements. The supports layout step is measured in millimeters. Displacements values are applied sequentially to each horizontal row. This parameter allows you to specify the type of details layout, for example, straggered layout.
local supportsHorStep = 300
local supportsVerStep = 200
Rebar mesh supports layout with setting the distance between elements.
Definition ReinforcingMeshSupportsDistanceLayout.h:20
table Displacements
Rebars rows displacements. Displacements values are applied sequentially to each horizontal row....
Definition ReinforcingMeshSupportsDistanceLayout.h:46
Example of rebar mesh supports layout with setting the number of cells passed between the elements:
Rebar mesh supports parameters. To support vertical meshes, C-shaped rebar in combination with a layo...
Definition ReinforcingMeshSupportsParameters.h:29
Creating double reinforcing mesh in base layer
The double reinforcing mesh in the object base layer is created by the CreateDoubleReinforcingMeshInBaseLayer() function.
meshParams.Supports = supportsParameters
ReinforcementContainer CreateDoubleReinforcingMeshInBaseLayer(Entity object, table clearCoverRules, DoubleReinforcingMeshParameters meshParameters, EdgeReinforcementParameters oEdgeReinfParameters, double oFrontOffset, double oBackOffset)
Creates a double reinforcing mesh in the object base layer. Currently Walls and Floors are supported.
Reinforcement with reinforcement units
Reinforcement unit row
The reinforcement unit row parameters are set using ReinforcementUnitRowParameters. It can be created by passing the required parameters: the reinforcement unit style and the layout type. Let's start by looking at the layout methods.
Layout with edge protection. With this layout the units are located between support unit which are located along vertical or horizontal edges. In this layout, the distance between the edge‑mounted unit and the previous one may differ from the specified step. To prevent unit overlapping, a minimum clearance between units is used, defining the smallest distance between units. If the layout algorithm results in with the distance less than the minimum clearance, the units that violates this requirement is not added to the row. By default, a minimum clearance is equal to 25 mm.
local unitStep = styleParameters.ReinforcementUnits.Step
Reinforcement units layout with edge protection.
Definition ReinforcementUnitEdgeProtectionLayout.h:16
number MinClearance
The minimum clearance between reinforcement units. The default value is 25 mm. This parameter sets th...
Definition ReinforcementUnitEdgeProtectionLayout.h:35
Uniform layout. With this layout the reinforcement units are located with a uniform step across the entire reinforcement area. This allows you to synchronize the reinforcement with the reinforcement of adjacent objects. To synchronize the position of a unit with the object above, you can offset the unit by a small distance so that the unit of the objects do not overlap, but stay close to each other. For this, reinforcement units row displacement is used.
local unitStep = styleParameters.ReinforcementUnits.Step
Example of creating a reinforcement unit row parameters:
local unitStyleId = styleParameters.ReinforcementUnits.UnitStyleId
-math.pi / 2
The axis is a vector which is attached to a fixed point.
The matrix of transformation in a three-dimensional space.
Three-dimensional vector.
Parameters of the row of reinforcement units.
Definition ReinforcementUnitRowParameters.h:24
Creating of reinforcement units in base layer
The reinforcement units in the object base layer is created by the CreateReinforcementUnitsInBaseLayer() function.
ReinforcementContainer CreateReinforcementUnitsInBaseLayer(Entity object, table clearCoverRules, object unitsInSectionParameters, InLayerAlignment oAlignment, number oOffset)
Creates the layout of a row of reinforcement units in the object base layer. Currently Walls and Floo...
Placement2DAxis
The enumeration defines one of the axes of the two-dimensional coordinate system.
Definition Placement2DAxis.h:23
Reinforcement unit row in section parameters. A section is a geometric object formed by dissecting th...
Definition ReinforcementUnitRowInSectionParameters.h:28