Documentation
After finishing work with model, let's begin creating documentation. Before starting making drawings, create separate filters for every pipe system (CW, SS and HW).
- On the Primary panel click Manage styles
 and select the
  Filters option.
 -
To create a new filter:
- In the Filters editor, create a new filter by clicking the New filter
 button.
 - Type the filter name – CW.
- On the right side of the window, set a new property by clicking the Add group button.
- In the Add group window, specify the following filtration rules:
- Object type: Pipe accessory;
- Property: System list;
- Operator: contains;
- Value: CW.
- Click the Add button.
- Click OK.
- Add groups for Pipe fitting, Plumbing fixture, Equipment, Route and Pipe in the same way.
- Click OK.
- Create 2 more filters in the same way – SS and HW.
Create a new drawing in the project:
- Open Project explorer
 . Click Create new drawing.
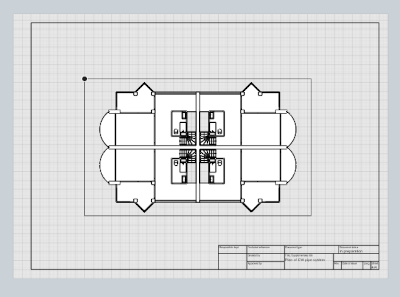
 - Type the drawing name – Plan of CW pipe system.
- Open the drawing by clicking its thumbnail.
- Specify page parameters:

Page format.
A2

Page orientation.
Album

Layout style.
Compact form
- The project name will automatically display in the title block. To add a drawing name, enter the text {Name} in the cell.
Let's proceed to the plan of CW pipe system creation. In the beginning, we need to place a view.
- Click the View
 tool. There is no an appropriate style on the list, create a new one.
 - On the Parameters panel, in the Display styles parameter, select the Other option.
- Select For MEP style in the editor.
- On the right side of the window, clear Pipe accessories, Equipment, Pipe fittings, Pipes and Routes options.
- Click OK.
- Specify view settings:
- Select the insertion point in the sheet.
|
|
View. |
02-Floor |

|
View scale. |
1:75 |

|
Display style. |
For MEP |

|
View depth plane offset. |
-100 |
Now, create a drawing title:
- Click the Text
 tool.
tool. - Define the text insertion area by two points.
- In the Text editor, select the GOST B font and specify the size 5 mm.
- Type the text – Plan of CW pipe system.
- Choose Align text center
 .
. - Click OK.
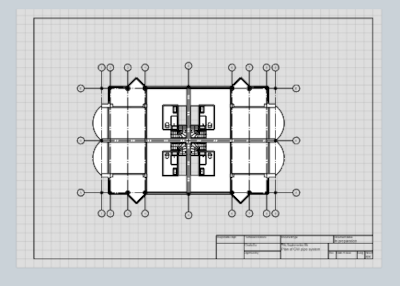
Let's place axes:
- On the Tools panel, select the Designation
 – Grid line
  .
. - Select the Automatically by view
 section type.
 - Specify the following parameters:
- Point the placed view. When the axes appear, left-click to fix the axes position.

|
Grid line extension. |
50 |

|
Grid bubbles display. |
Both |

|
Text style. |
Designation |
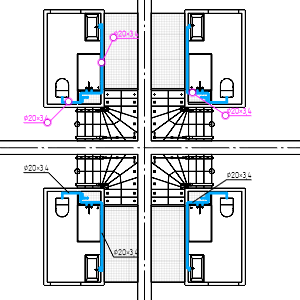
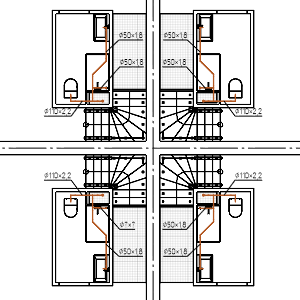
Next, place the CW plan in the drawing.
- Click the View tool. There is no an appropriate style on the list, create a new one.
- Insert the View:
-
View.
02-Floor
View scale.
1:75
Display style.
Default
- Select the View
- There is no an appropriate style on the list, create a new one. In the Display style parameter, select Other.
- In the Display styles editor, click the New display style button.
- Set the name of the Style to Engineering System Plan.
- On the right side of the window, left the Pipe accessories, Pipe fittings, Pipes, options selected.
- For the all selected options specify the Simplified level of detail.
- For the Pipes, set the Thickness of projection line to 0,50 mm, then set the Thickness of the section line to 1,00 mm.
- Click OK.
- Specify view settings:
- Holding Alt, click the handle. And combine the two views.
|
|
Display style. |
Engineering System Plan |

|
Filter. |
CW |
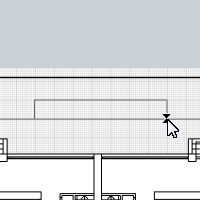
Next, place markers with dimensions on horizontal pieces of pipes in the drawing by the following actions:
- Put the designations on the drawing using the Tag tool:
- On the Tools panel, click Designation – Tag
 .
. - Specify the following parameters:
- Specify the insertion points of the tag in the drawing in places where riser pipes placed.
- You can change the tag position if needed.

|
Tag style. |
Pipe tag |

|
Tag leader line. |
Solid |

|
Tag orientation. |
Horizontal |

|
Text alignment. |
Left |
|
|
Text style |
Dimension |
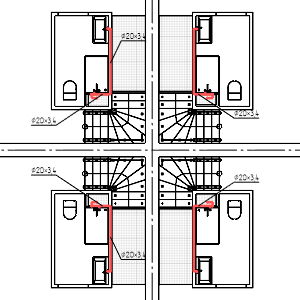
Copy the Plan of CW pipe system to receive the Plan of SS pipe system:
- In the Project Explorer hover over the Plan of CW pipe system and press Ctrl+C.
- Press Ctrl+V.
- Select a thumbnail and press F2 to rename.
- Type the drawing name – Plan of SS pipe system.
- Open the drawing.
- Change the drawing title. Type the Plan of SS pipe system text.
- Click OK.
- Select the CW pipe system plan on the drawing.
- Change the view parameters:
- Place markers on horizontal pieces of pipes in the drawing.
|
|
View. |
02-Floor |
|
|
View scale. |
1:75 |
|
|
Display style. |
Engineering System Plan |
|
|
Filter. |
SS |
Copy the Plan of CW pipe system to receive the Plan of HW pipe system:
- In the Project Explorer hover over the Plan of CW pipe system and press Ctrl+C.
- Press Ctrl+V.
- Select a thumbnail and press F2 to rename.
- Type the drawing name – Plan of HW pipe system.
- Open the drawing.
- Change the drawing title. Type the Plan of HW pipe system text.
- Click OK.
- Select the CW pipe system plan on the drawing. Change the view parameters:
- Place markers on horizontal pieces of pipes in the drawing.
|
|
View. |
02-Floor |
|
|
View scale. |
1:75 |
|
|
Display style. |
Engineering System Plan |
|
|
Filter. |
HW |
Renga already has a few prepared templates of schedules. Use one of them from Project Explorer > Schedules section any time they are needed in your projects.
But for our project we will create a new schedule. Before creating, let's add new properties.
In order to create a new property do the following:
- On the Primary panel click Manage styles –
 Object properties.
 - On the Object type properties tab, select Pipe accessories.
- On the right side of the window, click the Add property button.
- In the Add property window, select the Create new property option.
- Type the name – System for sorting in schedule, Data type – String.
- Then add existing property:
- Manufacturer
- Select Pipe Fittings from the object types.
- On the right side of the window, click the Add property button.
- Select the existing Unit of Measure property from the list. Click OK.
- Add the property Manufacturer in the same way.
- Add same properties for Equipment, Plumbing fixture, Pipes.
- Click Close.
Next, move on to a schedule creation. In order to create a new schedule:
- Open the Project Explorer.
- Click the Create new schedule button.
- Type the schedule title Plumbing fixture schedule.
In order to open the schedule in the Project Explorer, left-click its thumbnail.
Create Schedule
Schedule creating is performed by commands of adding columns, the columns are filled with data automatically if there was any data specified.
Before creating a schedule, on the Parameters panel, on the View  list, select the Aggregate identical records option.
Now let's add columns:
Mark
- On the Commands panel, click the Insert schedule column to the right
 button.
 - On the left side of the window select Pipe accessory on the list.
- After selecting the value, there are available parameters displayed on the left side of the window. Select the Mark value.
- Type Mark in the Header.
- In the Specify window, select the following object types: Pipe accessory, Pipe fitting, Equipment, Plumbing fixture, Pipe.
- Click OK.
Fixture
- Next, on the Commands panel, click the Insert common schedule column to the right
 button.
 - Type the title Fixture.
- In the Specify window select the following object types and their properties:
- Pipe accessory: Pipe accessory style;
- Pipe fitting: Pipe fitting style;
- Equipment: Equipment style;
- Plumbing fixture: Plumbing fixture style;
- Pipe: Pipe style.
- Click OK.
Manufacturer, System for sorting in schedule, Remarks
- On the Commands panel, click the Insert schedule column to the right button.
- On the left side of the window select Pipe accessory on the list.
- After selecting the value, there are available parameters displayed on the left side of the window.
- Hold CTRL and select Manufacturer, System for sorting in schedule, Remarks
- In the Specify window, select the following object types: Pipe accessory, Pipe fitting, Equipment, Plumbing fixture, Pipe.
- Click OK.
- Edit the titles.
Count
- Select any cell in the System column.
- Next, on the Commands panel, click the Insert common schedule column to the left
 button.
 - Type the title Count.
- In the Specify window select the following object types and their properties:
- Pipe accessory: Count;
- Pipe fitting: Count;
- Equipment: Count;
- Plumbing fixture: Count;
- Pipe: Nominal length.
- For the object type Pipe: Nominal length specify Unit as Meter and select the Summarize values on aggregate option.
- Click OK.
Schedule format is performed by parameters of Row height, Font family, Font size and style, as well as text alignment parameters.
- In the first row of the schedule type in the title: Plumbing fixture schedule.
- Select the cell with the Mark title, type 20,00 in Width
 .
. - For the cell with the Fixture title type 100,00 in Width .
- For the rest cells of the header type 50,00 in Width .
- Next, select the whole row with the title cells and specify the following format parameters:
- Finish the formatting the rest cells of the schedule on your own.
|
|
Font family. |
Arial |

|
Font size. |
3,50 |

|
Font style. |
Regular |
|
|
Horizontal alignment. |
Center |

|
Vertical alignment. |
Middle |

|
Row height. |
32,00 |
Identical records in our schedule are aggregated and displayed as a whole row. In order to add to the schedule such data as Mark, Product code, Unit of measurement etc., you must specify them for the every aggregated record.
Set systems for sorting in schedule:
- In the Parameters panel, set the filter CW. Set systems for sorting in schedule according to the table:
- In the schedule parameters panel, set the filter HW. Set systems for sorting in schedule according to the table:
- In the schedule parameters panel, set the filter SS. Set systems for sorting in schedule according to the table:
- In the same way fill all the properties for the rest objects in schedule.
- In the schedule parameters panel, set the filter (none).
- On the Parameters panel, on the Group by
 list, select the System for sorting in schedule option, Ascending.
| № | 1. Water metering unit of cold water | 1-1. Cold water supply |
| 1. | Ball valve 1/2" | Pipe - PPR PN20 50x8.3 |
| 2. | Spring-loaded check valve G1/2" | Pipe - PPR PN20 20x3.4 |
| 3. | Water meter G3/4" | Deck mounted faucet-mixer tap |
| 4. | Strainer G1/2" | Wall mounted bath shower mixer tap |
| 5. | Reduser tee PPR PN20 Dn50x20x50 | |
| 6. | Elbow 90° PPR PN20 Dn20 | |
| 7. | Tee PPR PN20 Dn20 |
| № | 2. Water metering unit of hot water | 2-1. Hot water supply |
| 1. | Ball valve 1/2" | Pipe - PPR PN20 20x3.4 |
| 2. | Spring-loaded check valve G1/2" | Pipe - PPR PN20 50x8.3 |
| 3. | Water meter G3/4" | Reduser tee PPR PN20 Dn50x20x50 |
| 4. | Strainer G1/2" | Elbow 90° PPR PN20 Dn20 |
| 5. | Tee PPR PN20 Dn20 |
| № | 3. Domestic sewage |
| 1. | Pipe - PP 110x2.2 |
| 2. | Pipe - PP 50x1.8 |
| 3. | Two-piece toilet |
| 4. | Shower tray (left hand) |
| 5. | Washbasin with pedestal |
| 6. | Tee 87,5° PP 100 |
| 7. | Elbow 87,5° PP 100 |
| 8. | Elbow 87,5° PP 50 |
| 9. | Tee 87,5° 100x50x110 |
| 10. | Elbow 45° PP 50 |
| 11. | Tee 87,5° PP 50 |
| 12. | Shower tray (right hand) |
| 13. | Elbow 90° PPR PN20 Dn40 |